
Phone scanning, scan enhancement, and watermark removal
The scan workspace turns photographed pages and existing scans into images or an image-based PDF. Import files from your computer, or capture pages on your phone and send them to the computer. Then check boundaries, orientation, filters, page order, and cleanup results. To obtain editable Word or Markdown, finish scanning and choose Continue parsing (继续解析).
This guide uses a synthetic two-page “Equations and triangles” worksheet. Page one contains printed questions and simulated handwritten answers; page two contains a diagram, a gray shadow, and a page number. Keep the original files for comparison.
Choose an entry
In the web app, open Utilities (实用工具) → Magic Pic. Four entries share the same workspace, where you can switch tools:
| Entry | Use it for |
|---|---|
| Scan enhancement (扫描增强) | Crop boundaries, correct orientation, flatten book pages, remove shadows, and apply filters |
| Handwriting removal (手写擦除) | Remove handwriting from a whole page or selected area while checking the printed content |
| Watermark removal (去除水印) | Remove watermarks, corner marks, and translucent text from a whole image or painted area |
| Object removal (图片消除) | Paint over unwanted text, stamps, stains, or objects |
The parsing and translation pages also provide Phone scan input (手机扫描录入) and Scan enhancement (扫描件增强). Their results can return to the corresponding workspace. This guide covers the current web app. Desktop entries depend on the client version; if absent, open Doc2X in a browser.
Sign in before processing. Supported inputs are PDF, JPG, PNG, and WebP. Each file can be up to 150 MiB, and a workspace holds up to 1,000 pages; a book spread counts as two pages after splitting. Images with too many pixels may require resizing first. Check the workspace for remaining pages, trial access, membership terms, and cleanup prices. A page's first processing counts toward the scan allowance; further adjustments to that page do not count again. Downloads do not use scan pages. Handwriting removal, watermark removal, object removal, and optional AI enhancement follow their separately displayed terms.
Step 1: Import computer files
- Click Add files (添加文件) and select the sample images or PDF. You can also drag files into the workspace or paste an image from the clipboard.
- Wait for thumbnails in the left sidebar. A multi-page PDF becomes multiple pages; click a thumbnail to select the current page.
- The workspace prepares an automatic enhancement preview for the current page. Inspect it before choosing to process other pages; importing a document does not mean every page has been reviewed.
- Remove an incorrect page with Remove current page (移除当前页). Use Add files again to append material.

Check the current page after import, then review the remaining pages. (workflow diagram). Open the image in a new tab to enlarge it.
Step 2: Capture pages on a phone and confirm sending
Skip this section if you already have computer files. Keep the computer's scan workspace open throughout the transfer.
- On the computer, click Phone scan (手机扫描), or choose Phone scan input from parsing or translation. After sign-in, a connection QR code appears.
- Open the QR link using the phone's camera or a browser that supports scanning, and continue in the phone browser. The page explicitly says Do not use WeChat Scan (请勿使用微信扫一扫).
- Wait for both devices to show that they are connected. On the phone, choose Continuous capture (连续拍照) or Use system camera or photo library (使用系统拍照或相册).
- For sheets, select Document → Single / Multiple capture (文档 → 单拍 / 连拍). For books, select Book → Single page / Spread (书籍 → 单页 / 双页). Use Swap book page order (交换书页顺序) if necessary. Fill light (补光) appears only on supported devices; Automatic capture on page turn (翻页自动拍摄) is also conditional. Use the shutter manually when these controls are unavailable.
- Keep the entire page in view and press the shutter. Review the captured thumbnails: Retake (重拍) a blurred image or Remove (移除) an unwanted one. Select Done (完成) to adjust the batch.
- Check crop boundaries, orientation, and page order on the phone. Generate previews, then choose Confirm sending to computer (确认发送到电脑). Taking a picture does not immediately send it.
- Wait until the computer-confirmed page count reaches the batch total. Check the newly added pages on the computer. The phone retains the batch until the computer confirms receipt.
If the connection drops or times out, use Retry this batch (重试本批发送). It continues the same batch without adding already confirmed pages again. You can first Save this batch's transfer files (保存本批发送文件) or Save original captures (保存拍摄原图). On a later visit, choose Restore photos and continue (恢复照片并继续) or Download recovery files (下载恢复文件) when offered; restoring still requires an explicit send confirmation. If the QR code expires, preserve the old batch before updating the code on the computer and reconnecting.
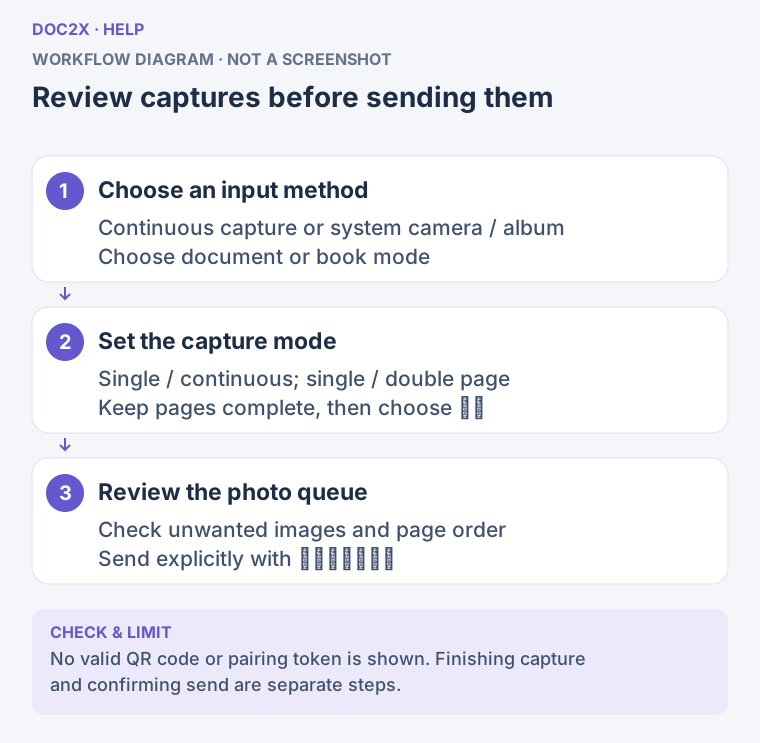
Review phone captures and explicitly confirm before sending them to the computer. (workflow diagram). Open the image in a new tab to enlarge it.
Step 3: Crop, rotate, and split book spreads
Select the crop tool to open Adjust document boundaries (调整文档边界).
- For a sheet, select Single-page document (单页文档). Use Auto-detect edges (自动找边) or Select whole image (选择整张).
- Drag corner points, edge midpoints, or the inside of the frame to fit the paper. The magnifier helps with alignment. Arrow keys make small adjustments; Shift increases movement.
- Use Rotate clockwise (顺时针旋转) if needed, or retain Automatically correct orientation (自动摆正方向).
- For books, select Book, then Single page or Spread. Adjust Spine position (书脊位置), check both page frames on the canvas, and swap their order if necessary.
- Click Finish adjustment and preview (完成调整并预览). After splitting a spread, inspect both resulting pages and their order.
In the enhancement tool, check Curve correction (曲面矫正). It is enabled by default for curved book pages or uneven paper. When no curve is detected, you can still use four-corner correction. After changing a frame manually, run detection again if you need new paper-curve detection.
Step 4: Choose a filter and review all pages
The nine filters are Smart enhancement, Original color, Remove shadows, Brighten, Sharpen, Ink saving, Grayscale, Black and white, and Invert. Start with smart enhancement. Compare original color for illustrations, shadow removal for uneven lighting, or ink saving/black and white for printing. Preserve small text, formulas, and diagram lines when choosing a result.
After changing settings, use the displayed processing action, such as Update page preview (更新本页预览) or Regenerate this page (重新生成本页). Zoom in and use Compare original (原图对照) before moving to the next page.
Apply enhancement settings to all pages (将增强设置用于所有页) copies only the filter, curve, and orientation settings; each page keeps its own frame. Click Enhance remaining N pages (增强剩余 N 页) to process the remaining pages, then review them individually. Each page has its own undo, redo, and reset controls.
If AI enhancement (AI 超清) is offered, review its quote before processing the current page. Compare the result and choose Accept effect (接受效果) or Discard effect, keep original (放弃效果,保留原稿). AI may redraw text, formulas, or diagram details. Discarding an already generated result does not cancel the generation charge described in the interface.
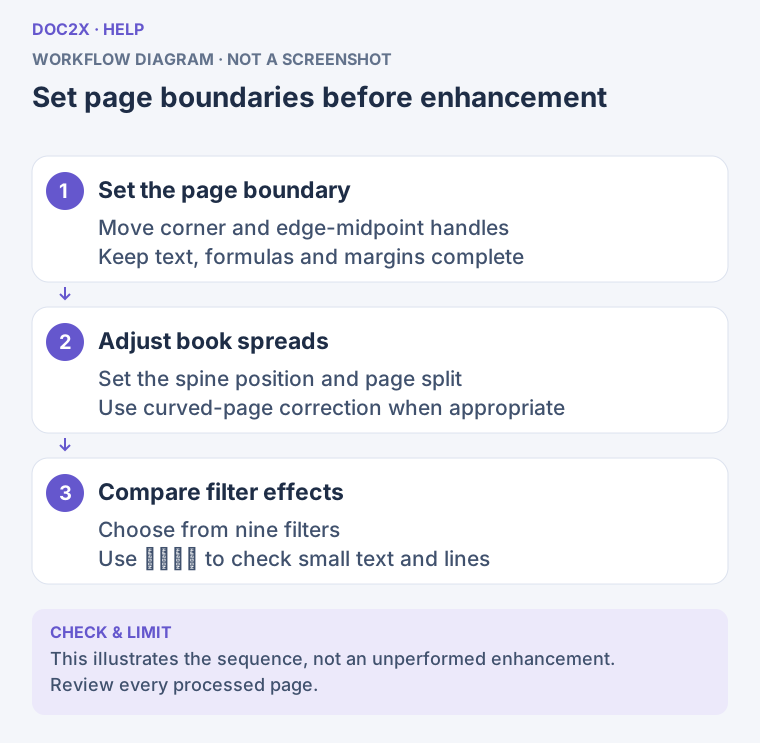
Adjust page boundaries and the book split before comparing enhancement results. (workflow diagram). Open the image in a new tab to enlarge it.
Step 5: Remove handwriting or selected objects
Clean a completed worksheet
- Switch to Remove handwriting (去除手写).
- Choose Whole-page handwriting removal (整页去手写) or Paint selection (涂抹选区) for a smaller area.
- For a selection, adjust Brush size (画笔大小) and paint over the handwriting. Multiple strokes are allowed. Use Clear selection (清除选区) to start over.
- Read the displayed price and click Remove handwriting from this page (去除本页手写) or Remove handwriting from selection (去除选区手写).
- When Check cleanup effect (检查清理效果) appears, zoom in and compare printed questions, formulas, diagrams, and places where handwriting overlaps print. Accept the effect if correct, or discard it and try a smaller selection.
Remove a stain, stamp, or unwanted object
Switch to Smart erase (智能擦除), adjust the brush, paint the unwanted area, and click Erase selected area (擦除选中区域). Inspect the reconstructed background and nearby content before accepting. Keep required question text outside the selection.
Generation and accepting the result are separate steps; read the price first. If the service is unavailable, the original and previously accepted pages remain available for downloading, enhancement, or local saving.
Remove watermarks
In the web app, open Utilities (实用工具) → Magic Pic → Remove watermarks (去除水印), or open the watermark workspace. Inside an existing scan workspace, switch to Remove watermarks. This tool handles watermarks, corner marks, and translucent text on images and scans. Use Remove handwriting for handwritten answers, or Smart erase to explicitly select stains, stamps, or unwanted objects.
The same PDF, JPG, PNG, and WebP inputs and file/page limits described above apply. PDFs are imported as pages. Select and process each page of a multi-page document; one action does not automatically remove watermarks throughout the PDF.
- Import a file, select the current page, check its boundaries and orientation, and keep the original file.
- The default is Whole-image watermark removal (整张去水印) for the current page. For a smaller area, choose Paint selection (涂抹选区), adjust Brush size (画笔大小), and paint over the watermark. Multiple strokes are allowed; Clear selection (清除选区) starts over.
- Read the current price and click Remove watermarks from this page (去除本页水印) or Remove watermarks from selection (去除选区水印). Selection mode requires painted strokes. Processing requires sign-in.
- At Check cleanup effect (检查清理效果), zoom in and compare the original, checking printed text, formulas, diagrams, and areas covered by the watermark. Choose Accept effect (接受效果) if correct. Otherwise choose Discard effect, keep original (放弃效果,保留原稿) and try a smaller selection.
- After accepting, use saving and downloading to download an image, image ZIP, or image-based PDF, or save to local files. For Word, Markdown, or searchable content, choose Continue parsing afterward. Watermark removal itself does not create editable text or an OCR text layer.
Where a watermark overlaps content, residue or changes may remain. Recovery of hidden text is not guaranteed. Review before accepting; painted strokes or an unaccepted generated preview are not a completed export result.
Visitors can see the entry before signing in, but processing requires sign-in and an available service. The advertised membership price is 10 points per successful processing action, rather than per uploaded file. Check the quote again when regenerating a page. The workspace uses the price published by the service; trial pages can be free, with trial access and membership permissions determined by the current account. Points are charged when a result is generated; failed processing is not charged. Discarding a successfully generated effect does not refund that generation. Scan page allowance and cleanup points are separate measures; see the allowance explanation above.
If the service is unavailable, continue enhancement, download existing results, or save locally, then retry later with the original retained. For a disabled button, check sign-in, service status, valid boundaries, painted strokes in selection mode, and any result awaiting acceptance or discard. Follow the workspace prompt if points are insufficient. On failure, preserve completed pages, inspect the message, and retry the current page. A download showing an earlier effect does not confirm that the new processing succeeded.
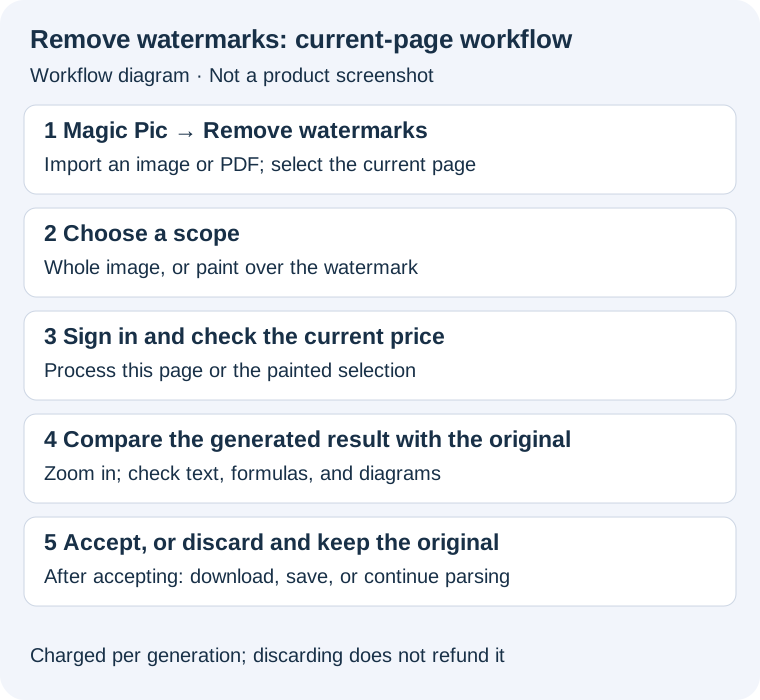
Watermark workflow diagram, not a product screenshot. Open the image in a new tab to enlarge it.
Step 6: Arrange, save, and download
Select a thumbnail and use Move page earlier / later (页面前移 / 页面后移). On narrow screens, use the Page actions (页面操作) menu. Check numbering, duplicates, and left/right book order. Look for N pages complete (已完成 N 页) at the bottom.
| Goal | Action and result |
|---|---|
| Combine photos into one PDF | Download PDF (下载 PDF) creates an image-based PDF in the current order |
| Save one image | Download image (下载图片), or Download → Download current page image (下载当前页图片) |
| Save all page images | Image ZIP (图片 ZIP) downloads an archive |
| Use the unenhanced files | Download → Discard enhancement, use original (放弃增强,使用原文件); on the phone, Send originals to computer (发送原图到电脑) and follow the confirmation flow |
| Continue later | Download → Save to local files (保存到本机文件), then find it under Local files (本机文件) |
| Create editable text | Continue parsing, complete recognition, then export Word, Markdown, or another supported format |
| Translate scans | Continue translation (继续翻译), or return to the translation workspace used to start the scan |
| Send from phone to computer | Confirm sending to computer, then wait for receipt confirmation |
The scan PDF consists of page images and has no OCR text layer. Image downloads use formats such as JPG/PNG according to the current result. They do not overwrite the originals. Find downloads in your browser's download list or the selected save location; phone save locations depend on the browser and operating system.
Under Local files, rename a document and Save name (保存名称), rearrange/copy/remove pages, Continue editing (继续编辑), or download PDF/image ZIP. Restore mistakenly deleted records through Recycle bin → Restore record (回收站 → 恢复记录). Permanent deletion cannot be undone. Pending crop, filter, or painted changes are not included in a download until their preview has been generated.
Local records belong to the current browser and account or phone connection; they do not sync across devices. Clearing browser data can remove them, so download important material. If you see Unfinished editing found (发现上次未完成的编辑) on return, select Restore editing (恢复编辑) to restore the frames, filters, and undo history.
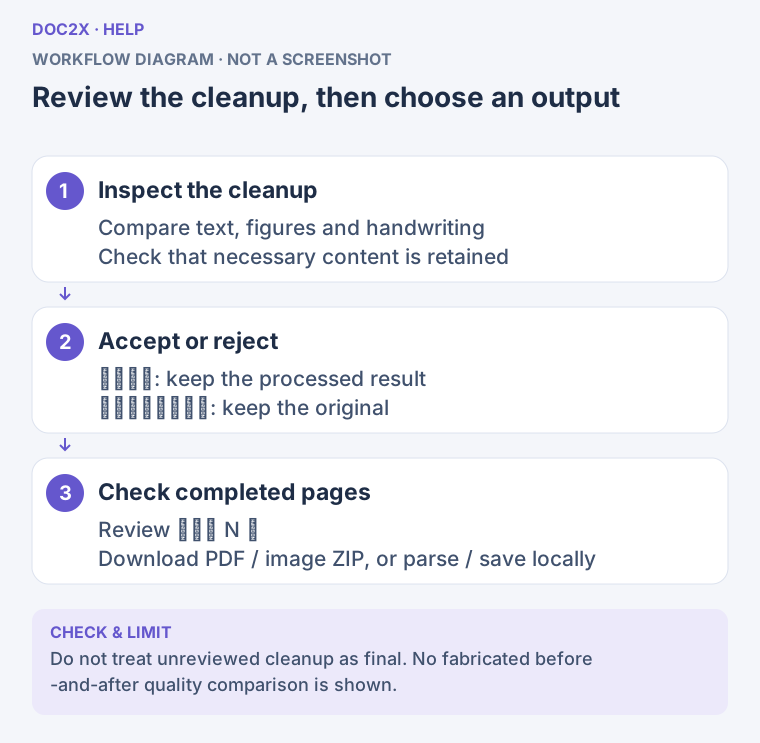
Review the cleanup result, then download, save locally, or continue parsing. (workflow diagram). Open the image in a new tab to enlarge it.
Troubleshooting
| Problem | Recovery |
|---|---|
| Camera will not open | Allow camera permission in the phone browser, or use the system camera/photo library; preserve existing captures |
| Computer has not received photos | Confirm that sending was approved and the computer workspace is open; retry the batch and check confirmed counts |
| Processing button is unavailable | Wait for the service, check valid boundaries, paint a selection for local cleanup, and accept/discard any pending result |
| Scan allowance is exhausted | Check the displayed allowance; originals and existing results remain downloadable, and follow the interface for adjusting processed pages |
| Current page failed | Keep the original and retry the page; preserve completed pages and process in smaller batches if necessary |
| File or pixel count is too large | Resize the image or split the PDF before importing again |
| Download shows an earlier effect | Update the preview and accept cleanup first; changing settings or painting alone does not alter the output |
| You need searchable PDF or Word | Continue parsing, complete recognition, then use the parsing workspace's export options |