
Classroom workflows: answer pages, practice, grading, knowledge cards and whiteboards
Start with a reviewed and saved “Triangles classroom practice.” This guide explains how to share answers, collect student work, grade it and teach from the material. Examples are self-written. Check your space and permissions in the teacher question bank first. For importing, review and paper composition, see the question-bank guide; for document editing, see teaching materials. Labels below match the Chinese interface.
Choose the student workflow
| Goal | Teacher entry | Student experience |
|---|---|---|
| Read reference answers, explanations and teacher-provided videos | 答疑发布 | Read-only answer pages, without submissions or chat |
| Submit text or photographed work | 练习与批改 | Individual answer link; feedback according to teacher settings |
| Take a timed quiz | 小测设置 within a practice | Start instructions, timer, automatic saving and submission |
| Present a lesson | 开讲 in a saved material | Teacher-controlled presentation of that saved revision |
| Keep reusable board work | 课堂白板 | A separate whiteboard in the teacher's space that must be saved |
Answer publications are available to people holding the link. Distribute individual practice links to the intended students; a personal link does not establish verified real-world identity. Editors can edit and publish. The publisher role, when enabled by the service, can publish without editing questions or materials, and can close, clean up or withdraw only its own publications. See spaces and members.
1. Publish read-only answers
Publish and distribute
- Save the teaching material and review answers and explanations. Questions with no answer or answers awaiting review cannot be published directly.
- Open 答疑发布 → 新建答疑发布. In 发布学生答疑, choose the saved material.
- Check the selected questions; questions with answers are selected by default. Optionally add video titles and teacher-provided HTTPS video links.
- Set opening and closing times, confirm sharing with link holders, then select 确认发布.
- Open the publication record, keep each question-instance link or QR code, and use 预览学生页面 to check the result.
Students scan a code to view that question's reference answer, explanation and video link. This page does not accept student answers. Publication uses a fixed saved material revision; later edits do not automatically update the link. Teacher notes, internal sources and the whole material are not passed through as a complete document, but public reference sources may appear and should be reviewed too.
Before opening, after withdrawal or after expiry, students cannot retrieve the answers and images. Teachers can search and filter publication records, view QR codes or 撤回 the publication. Recipients may retain content they previously accessed.
Print a QR code before each question
Publish answers for the same material and saved revision first. In 预览与输出 → 题前答疑二维码, choose a valid publication. It must match that material and revision and must not be withdrawn or expired. No QR code is added by default; especially for exams, confirm whether an answer link should appear on the paper.
Correct a published answer
Open 答案勘误 in the publication record, select a published question, and enter the corrected answer, explanation and public correction note. Confirm that the correction was checked and may be shown to students using the original QR code, then select 发布勘误.
A correction adds revised answers to the existing link. Publish again if replacing the question itself. Corrections require content-editing permission, cannot be added to withdrawn publications, and can only reuse already-published images. A publisher-only member cannot make answer corrections.
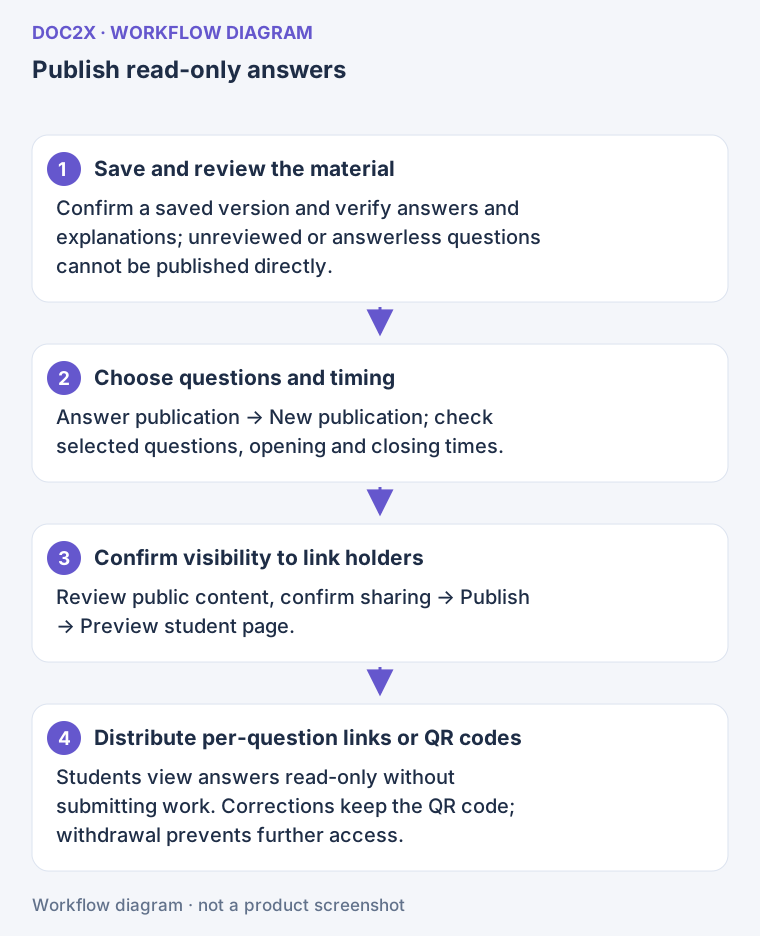
Workflow illustration: answer publication uses a saved revision and shares selected answers with link holders; corrections keep the original QR code.
2. Create a practice and distribute it
Define scoring rules
- Open 练习与批改 → 创建练习. In 创建练习与评分规则, choose a saved material and enter a practice name.
- Review every question's scoring mode: 教师评分, single-choice matching, multiple-choice set matching, true/false matching or short-answer matching.
- For automatic matching, enter one acceptable answer per line. A non-matching short answer needs teacher review; it has not been judged incorrect by AI.
- Teacher-scored questions can have scoring points. Their total must equal the question's points.
- Confirm that the rules have been reviewed and select 确认创建练习.
The current creation interface makes links valid for 30 days. A practice retains the material revision used at creation, and scores are visible only to teachers by default. Editing the original material does not update an existing practice.
Distribute by identifier or class
For a small group, enter one 作答编号 per line and select 生成作答链接. A batch accepts 1–200 identifiers, each up to 60 characters. Use 打印 / 复制链接 to distribute one link per student; do not use one person's link as the whole class's entry.
For class-based distribution:
- Open 班级与名单, enter a class name and select 新建班级.
- Paste names with optional student numbers; choose 预览, then 加入名单.
- Select a practice, choose 发给班级, select the class and 生成作答链接.
- Under 打印 / 复制链接, filter by class and copy the name / student-number / link table, or print QR cut-out cards, 12 per A4 page.
Removing a student from a roster does not invalidate an existing link. Old submissions retain the previous name; re-adding creates a new student record. Deleting a class keeps submissions by default unless the explicit option to delete submissions and links is selected.
Student answers and submission
Students open their individual link and fill 你的作答, up to 2,000 characters per question. For handwritten work, use 拍照作答 / 选择相册. Uploaded photos can be rotated or removed. Limits are six photos per question, 40 per submission and 15 MB per photo. Photos use the teacher space's storage capacity.
Wait for photo-save confirmation, then choose 提交作答 and wait for the submitted confirmation before leaving. Ordinary practice links allow one submission; answers and photos cannot be edited afterward. Ordinary text drafts are primarily local to the device. 作答备份 TXT is a backup, not a submitted assignment.
If submission confirmation is uncertain, keep the page and retry that same submission or refresh to confirm. Pending answers are retained and frozen while the result is checked. Finish confirming pending photo operations before submitting. Photos cannot be changed after submission, closure, expiry or the quiz deadline.
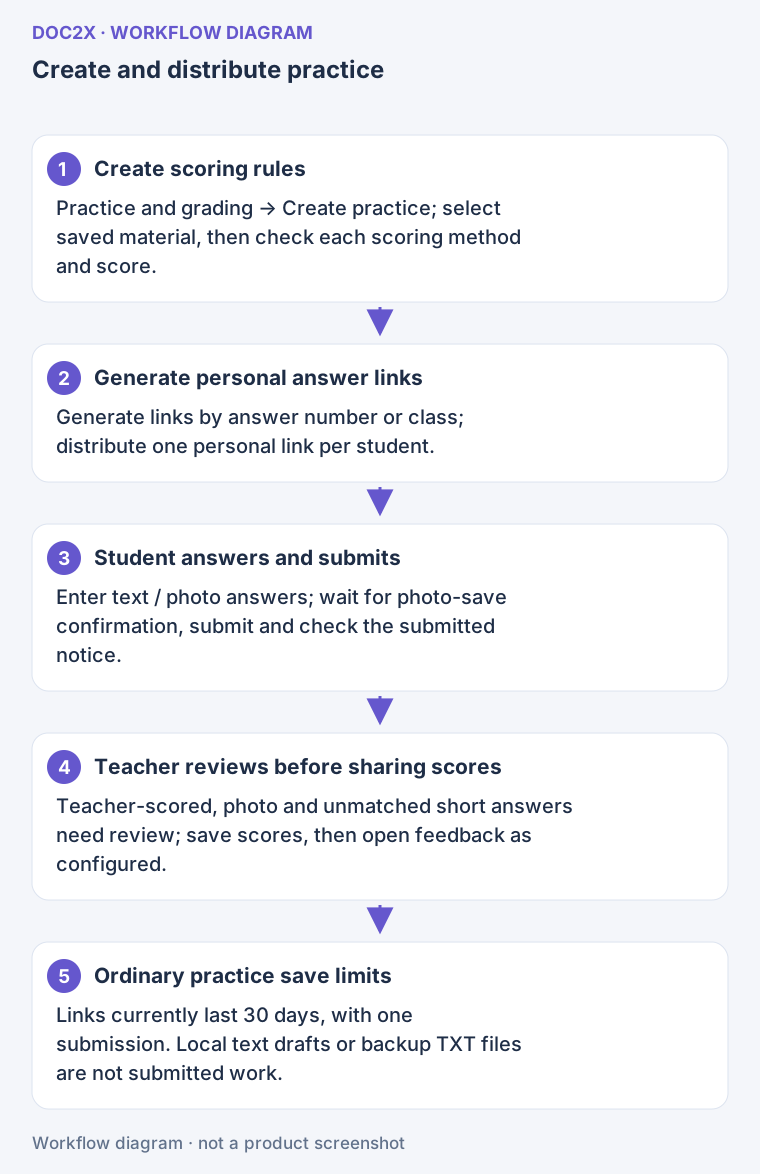
Workflow illustration: confirm scoring rules, issue one link per identifier or student, and finish saving photos before submission.
3. Turn a practice into a timed quiz
Open 设为小测 / 小测设置 and set the time limit, opening time, deadline and name watermark. Select 保存小测设置. The limit is 1–300 minutes; at least a time limit or deadline is required.
Students first see quiz instructions and choose 开始作答 to receive the questions. Questions are not sent before starting. Leaving the page does not pause the timer. Quizzes save automatically and can resume saved progress after a refresh or on another device; students should still watch the save status.
After 提交作答, the 确定交卷? dialog offers 交卷 or 继续作答 and lists unanswered questions. At the deadline, the last saved answers are submitted automatically. A teacher can 提前收卷: students who have not started cannot begin, and active attempts are submitted.
Changing the time limit or deadline affects students already answering. Quiz mode cannot be canceled after someone has started. 考后公开成绩 is shown only after the student has submitted and the quiz has ended; its timing differs from ordinary practice feedback.
4. Review scores, export results and prepare remediation
Grade and release feedback
- In 练习与批改, search for a practice and filter by active, closed or expired. Select it and choose 刷新答卷.
- Check submission counts, the saved material revision, per-question score rates and graded / pending counts.
- Select 教师复核, enter 得分 and 评语, or score individual rubric points, then choose 保存评分.
- For photos, open 照片作答与批注. Use red / blue / green pens, zoom, rotation, undo-stroke or clear. Marks and scores are saved together with 保存评分.
- Once reviewed, release scores to students for an ordinary practice, or use post-quiz results for a quiz. Feedback can also be hidden again.
Students use the same answer link to see scores, comments, rubric scores and photo marks. Releasing scores does not automatically disclose standard answers. Historical grading revisions are read-only. Objective questions answered only with photos, subjective questions and non-matching short answers still need teacher review; these controls are not AI automatic marking.
For concurrent grading conflicts, use 关闭并刷新答卷. If a save result is uncertain, confirm the previous grading operation before submitting another one.
Export and interpret results
Choose 导出成绩, select all students, a class or manual identifiers, then 下载 Excel. The file contains per-question scores, totals, ranks, incorrect and unanswered questions, and question statistics. Ungraded questions are excluded from score rates. Partly graded attempts use only their graded scores for totals and ranks, so they are not complete results for comparison.
Create a review or differentiated assignments
Questions already graded below full marks can form an error-review material. Shared-context question groups remain together. Open the result under 教学材料 to review and edit it.
For multiple practices or differentiated materials, open 错题与分层作业:
- Choose 从练习错题出发 and select practices, classes and attempts; or choose 从一份材料分层 and select a material.
- Select 分析错题与知识点 and review submitted attempts, pending grading, questions and warnings.
- Choose 错题回顾 or A / B / C 分层. For tiers, check knowledge points and each tier's question types, counts, scores and difficulty counts.
- Select 预览三档候选. Review candidate questions and shortages, adjust the scope or counts, then 保存 A / B / C 三档作业.
- After 已保存到教学材料, choose 打开材料. If the result is pending, use 恢复上次生成 to recover the same material.
查看错题来源 shows teacher-only practice, student, score, grading revision and reference information. It is excluded from student outputs. Differentiation from a material directly does not create student-source records. After reordering or replacing questions, check the original associations.
Practices can be closed and reopened within their validity period. Expired practices cannot reopen, but existing attempts can still be graded. 清理练习 after closing deletes attempts, grading history and links. The original teaching material and previously generated remediation materials remain; read the confirmation scope before proceeding.
5. Upload and review paper assignments
First generate answer identifiers or assign the practice to a class, then open 纸质作业批改 for that practice.
- Enter a batch name, choose 新建纸卷批次, and upload paper images or a PDF.
- Assign the student / identifier and page number to every page. Filename matching can help, but check each match.
- Select a question number and 框选作答, or use the whole page as its answer. Add answer text and 保存本页.
- Review students, page numbers, regions and text, then choose 提交本批次评分.
A batch supports up to 100 pages. PNG, JPEG and WebP images are limited to 15 MB each; PDFs to 100 MB. Identifiers with existing online answers, drafts or photos are not simply overwritten. Unmarked questions or photo-only answers still need teacher grading.
Use 查看上传原图 / 调整扫描图像 when a scan needs improvement. Applying a new scan image to an annotated page clears its regions and text, so check again. Region positions can be reused on unannotated pages with the same page number and similar proportions; inspect each page afterward.
识别整页文字 uses one parsing page of quota per page. Confirm the quota first, fill suggestions only into unanswered objective fields, compare with the image and save. Scan enhancement has a separate daily page allowance.
For filled answer bubbles, choose 设为填涂行, correct the orange regions and save, then 读取本页填涂. Mark each row 已对照确认, choose 填入已核对答案, and save. This reads ink patterns to suggest answers; it does not overwrite existing text or automatically submit grading, and is not large-model automatic marking.
If an operation result is uncertain, use 恢复上次纸卷操作 first; the source images and progress remain. If feedback is already open for the practice, graded results may become visible immediately after submitting the batch, so finish review before submission.
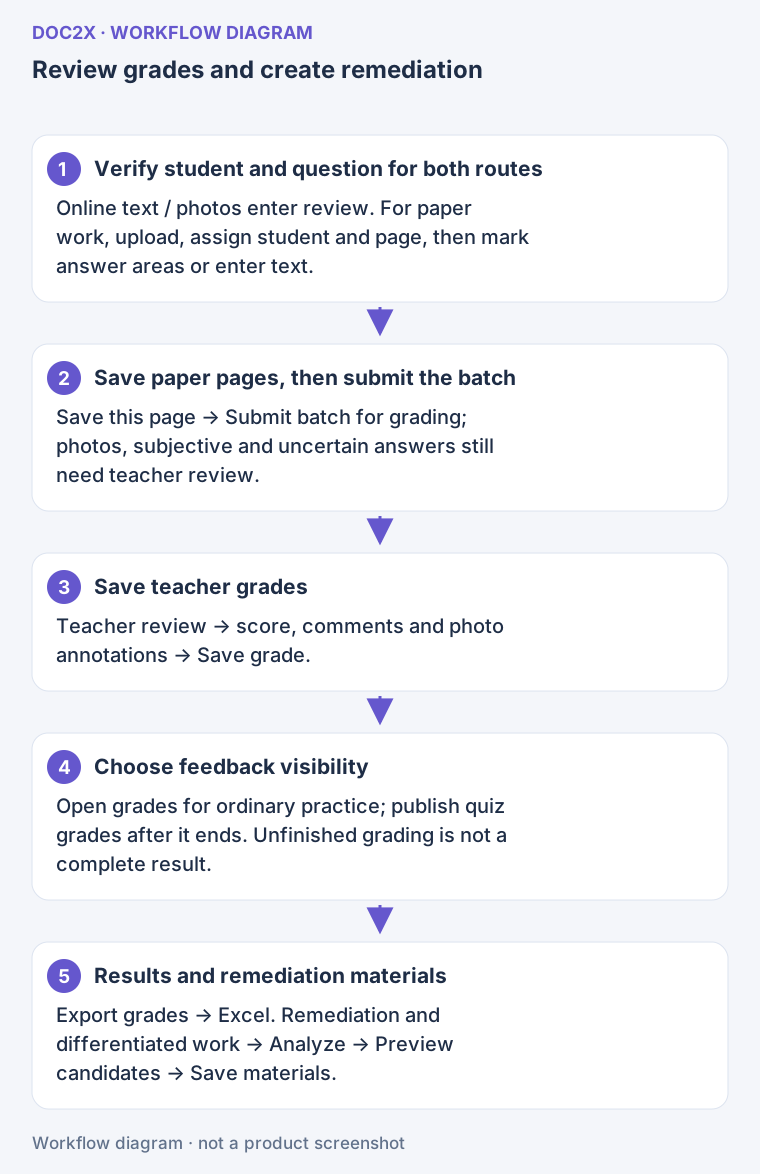
Workflow illustration: online and paper answers feed teacher review; save grades, choose feedback visibility, then export results or create remediation materials.
6. Build knowledge points and knowledge cards
Open 知识点与知识卡 → 新建知识点 and fill 知识点名称. A name alone can classify questions. To make a teaching card:
- Add curriculum or directory, parent knowledge point, school stage, subject, curriculum / directory version and aliases.
- Fill 概念与定义, 适用条件, 方法与步骤, 易错点 and 来源说明.
- Under 关联例题 → 添加例题, select questions and choose 关联这道题. Reorder or remove examples as needed.
- Select 保存知识卡. When creating from inside a question, use 保存并选用. Later, search for a knowledge point, concept or method and select 编辑知识卡.
AI 补充讲解 requires a model and quota confirmation. Select 生成建议, review and edit the draft, then 核对后采用. Suggestions do not overwrite saved content automatically, and stale drafts cannot be applied directly. Read-only members cannot edit or generate AI explanations.
In the material editor, use 插入知识卡, optionally including linked examples and explanations. Knowledge cards have no standalone export button: preview, teach or export them through a material. Cards and examples use fixed reference revisions, so later changes do not alter old materials automatically.
For student fill-in handouts, enable 学生填空版, edit blanked text and note-taking space, then choose that mode in material output settings and save. Recheck the fill-in text after explanation updates. Use 重试确认保存 if saving is pending; a local draft is not a cloud version.
7. Teach from a saved material
Save the material until it shows 已同步 · 版本 N, then choose 开讲, or 从预览开讲 in output preview. Fill or remove template placeholders first. The presentation uses the saved revision opened for the session.
Use 上一页 / 下一页 or the outline, then 显示答案 / 显示解析 as the lesson progresses; hide them again when needed. Answers awaiting review or missing answers cannot be revealed directly. Black-screen and white-screen modes can pause the displayed content.
Annotation tools include browsing, pen, highlighter, line and eraser, with color, width, undo, redo and clear-current-page controls. Switch among material, dynamic geometry, whiteboard and timer as needed. Teacher content starts hidden; deliberately enable it if appropriate. Dynamic-geometry dragging is not saved.
Under 计时 → 正计时 / 倒计时, choose a preset or enter minutes, then 设定 → 开始. Pause, continue or reset as needed. Countdown supports 0.5–180 minutes and an optional sound. Touch browsing supports horizontal swipes; fullscreen and keep-awake depend on the browser. Exit or press Esc to return.
Presentation annotations stay only in the current browser tab's temporary storage. Refreshing can restore them; closing the tab removes them. They are not saved to the material or cloud, and only the latest four materials' annotations are retained. Use a saved whiteboard for board work you need to keep.
8. Edit and save a classroom whiteboard
- Open 课堂白板 from the sidebar or the presentation's whiteboard entry. Choose 新建白板 or an existing saved board and enter a title.
- Add pages, name them and choose 纯白 / 方格 / 横线 backgrounds.
- Use select/move, freehand pen, text, sticky note, rectangle, ellipse, line and arrow tools. Selected objects can be moved, resized, edited, copied, staged, pasted, reordered or deleted. Undo and redo are available.
- Duplicate, move forward or delete pages as needed. Choose 保存白板 and wait for 已保存 · 版本 N, or 另存为新白板 to keep a separate board.
- Export the current page as SVG or the whole board as
.whiteboard.json. Use 导入白板文件 to reopen valid board data later.
Limits are 20 pages, 200 objects per page and a 2 MB imported board file. Export uses current editor content, so it can back up an unsynchronized draft. 草稿已留本机 and 返回授课 do not replace a cloud save.
For uncertain results, choose 重试白板保存. On version conflicts, save as a new board or reload the cloud version after preserving your work. If browser storage is unavailable, save to the cloud or export before refreshing. Read-only members cannot edit or save.
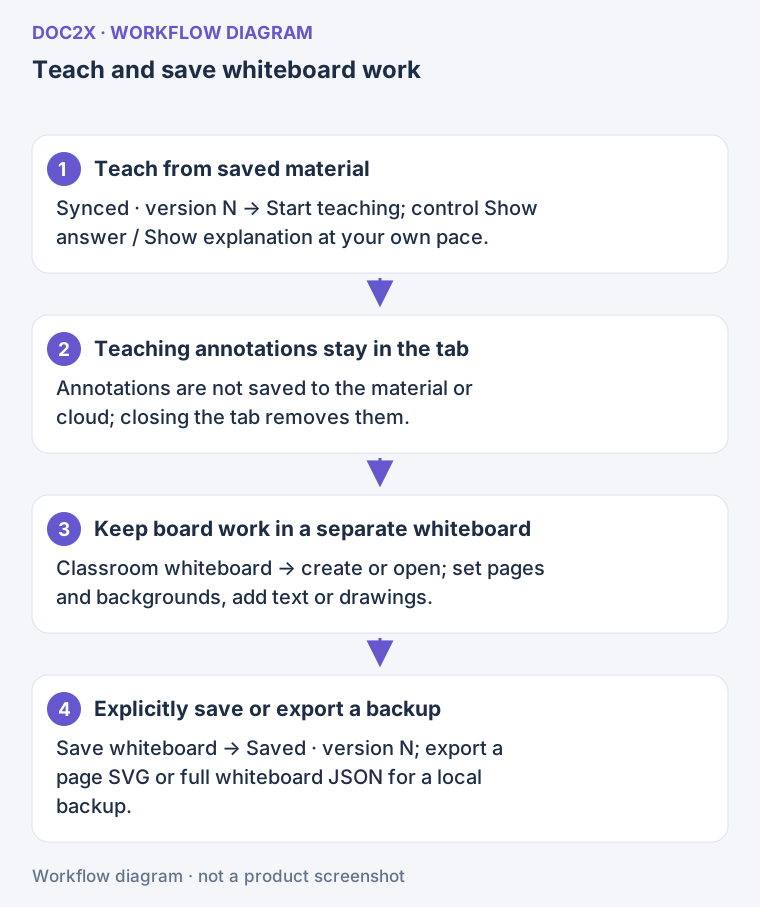
Workflow illustration: presentation annotations are temporary in the current tab; save an independent whiteboard or export a file for lasting board work.
Continue with editing and outputting materials, templates and team collaboration, or importing, selecting and composing questions.