
AI Presentations: From a Topic or PDF to PPTX
This tutorial uses a synthetic “Saving Water at School” presentation to walk through creating a project, adding sources, choosing a style, generating, editing and downloading. Open Utilities → Magic Pic → AI Generate PPT. If your navigation still shows Magic Slides → PPT Generator, it opens the same presentation workspace.
Already reviewed a result in Organize Questions? Use Teaching Slides from Reviewed Questions. The “Book to Lessons” and “Exam Explanation: One Question per Slide” options on this page start a new AI creation task.
The current PPT interface includes Chinese labels. Key labels are included below so you can match the instructions to the screenshots.
1. Choose a Creation Method
| Method | Best for | Main steps | Download |
|---|---|---|---|
| Smart Layout (智能排版) | Editing individual text, formulas, images and shapes | Describe requirements → Generate presentation → Edit | Editable PPTX |
| Creative Images (创意生图) | AI artwork for the entire slide | Describe requirements → Review outline → Edit outline → Page design → Generate images → Preview | Image PPTX; editable PPTX after parsing the slides |
For a first project, try Smart Layout. It opens the editor after generation, without creating full-slide images first or requiring an extra “Adopt outline” step. Creative Images lets you confirm the outline before generating images.
2. Create a Project and Describe the Audience
- Sign in to Doc2X and open AI Generate PPT.
- If an existing project is open, click New project (新建项目) → Confirm (确认) at the top right. Your previous projects remain in the history.
- Choose Smart Layout or Creative Images.
- In PPT topic and requirements (PPT 主题与要求), describe the topic, audience, key points and presentation length. For example:
Create a six-slide presentation about saving water at school for middle-school students.
Include common examples of waste, three practical actions, a classroom discussion and an action checklist.
Keep slide text brief and put detailed explanations in speaker notes.
Do not invent statistics or unsupported water-saving percentages.
“Report” and “Book to Lessons” also work with a topic alone. Without a PDF, content is organized from the topic and general knowledge, and no source images are used. Add the relevant documents when the presentation depends on specific data, citations or textbook content.
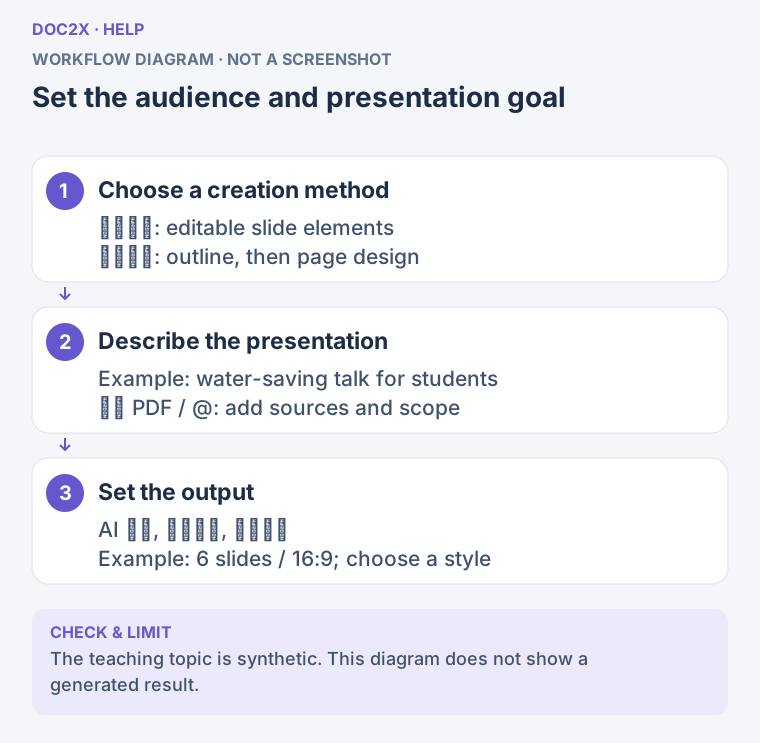
Create a presentation: choose a method, describe the audience and requirements, then set the slide count and visual style. (workflow diagram). Open the image in a new tab to enlarge it.
3. Use Your Documents: Parse First, Then Reference a PDF
Reference PDF (引用 PDF) selects documents that have already been parsed. To use a new file on your computer:
- Go to document parsing, upload the PDF and wait for parsing to finish.
- Return to the PPT workspace. Click Reference PDF, or type
@in the topic field. - Search by document name in My PDFs (我的 PDF) and select a record. Selected documents appear above the input.
- Add further documents individually. Check the parsing record when names are similar. Use Load more (加载更多) for older files or Refresh (刷新) for a recently parsed file.
- In Content scope (内容范围), specify the chapter or section, such as “Only Chapter 2 on protecting water resources; omit the extension activities.”
- Optionally enable Allow original PDF images (允许参考 PDF 原图). AI may choose relevant source images; this does not guarantee an image on every slide. The switch is unavailable without a referenced PDF.
“Report” and “Book to Lessons” accept up to 20 PDFs. The picker lists parsed PDFs for the current account. Typing a filename into the topic does not attach that document.
4. Set the Scenario, Slide Count, Ratio and Style
| Setting | How to use it |
|---|---|
| Scenario (使用场景) | Choose “Report (资料汇报)” for general presentations, “Book to Lessons (书籍转课件)” for chapters, or “Exam Explanation: One Question per Slide (试卷讲解:一页一题)” for questions |
| Content scope (内容范围) | Specify chapters, selected content or question numbers. Leave blank for the full selected scope |
| AI model (AI 模型) | Choose a text model from the current list. It determines text-task billing |
| Target slides (目标页数) | Set 3–40 for reports and book lessons; check the actual number after generation |
| Aspect ratio (画面比例) | Smart Layout uses 16:9; Creative Images offers 16:9 / 4:3 |
| Visual style (视觉风格) | Choose “Editorial (编辑精选),” “Research (学术报告)” or “Business (商务提案)” on the right |
These styles guide AI layout; they are not an upload field for an existing .pptx template. Choose a style and edit the resulting elements afterward. The example uses Report, 6 slides, 16:9 and Research.
5. Smart Layout: Generate and Edit Each Slide
Generate and Review
- Check the topic, sources and settings, then click Generate presentation (生成演示文稿).
- Follow the displayed task progress. To stop, click Cancel (取消) and wait for confirmation.
- Once generation finishes, the presentation editor opens.
- Select thumbnails on the left or use the previous/next buttons below the canvas. Check titles, text, images and formulas against the source where appropriate.
If the page says the presentation was generated but could not be opened, click Reopen result (重新打开结果). This reads the existing result without generating it or charging for generation again. Use Copy task ID (复制任务号) in the progress area to check the task against AI consumption records.
Edit Content and Layout
- Click Editing tools (编辑工具) to open the panel on the right.
- Select text on the canvas or in the element list, then edit Text content (文本内容). For example, change “Start today” to “Each class completes one water-saving action this week.”
- Adjust the selected element's available style, position and size controls. Drag or resize on the canvas and check for overlap.
- Use the toolbar to insert text, formulas, images and shapes. Inserted images can be PNG, JPEG, WebP or GIF, up to 8 MB each.
- Use Bring to front / Send to back (置于顶层 / 置于底层) to fix overlapping elements. Text supports left, center and right alignment.
- Open Speaker notes (演讲备注) to add explanations, up to 6,000 characters per slide.
- Use Undo / Redo (撤销 / 重做) for mistakes:
⌘/Ctrl+Zand⌘/Ctrl+Shift+Z. - Check the save status at the bottom of the editing tools. Use Save changes (保存修改) when needed and confirm that the project is saved before switching projects.
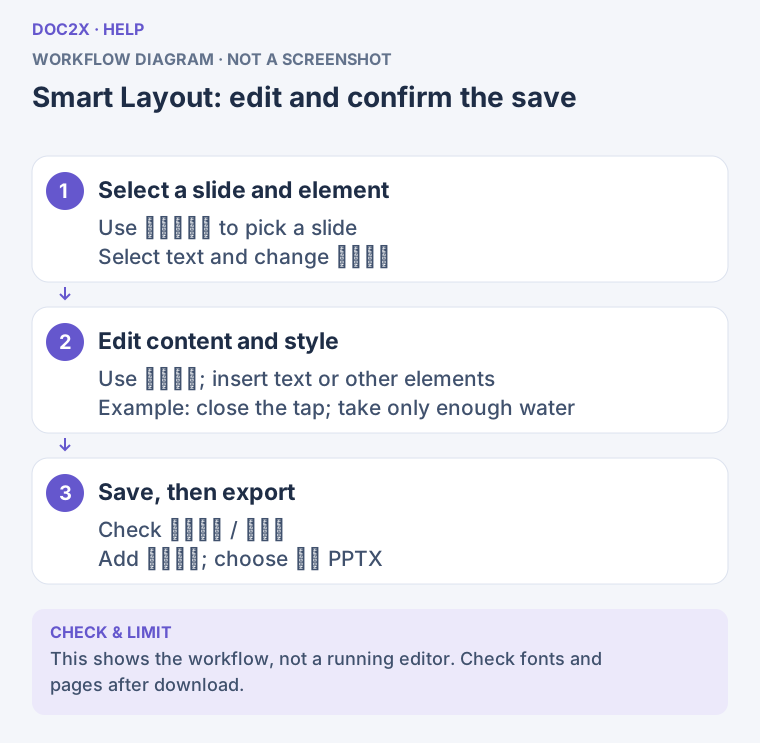
Smart Layout result: select a slide and an element, edit its content or style, check the save status, then export PPTX. (workflow diagram). Open the image in a new tab to enlarge it.
Download Editable PPTX
- Click Export PPTX (导出 PPTX) at the top right.
- Check the slide count in Export presentation (导出演示文稿) and enter a filename.
- Click Download PPTX (下载 PPTX), then open it in PowerPoint or another application that supports PPTX.
- Check fonts, formulas, images and layout. If the export dialog lists slides with overflowing text, the file still downloads; adjust those slides in PowerPoint.
The export preserves editable text, shapes, original images and SVG. Edit existing slides directly for small revisions. To reorganize the entire presentation, return to Creation requirements (制作要求) or create a new project; submitting generation again starts a new AI task.
6. Creative Images: Confirm the Outline, Then Generate Slides
Review and Edit the Outline
- Choose Creative Images (创意生图) and complete the topic, source and style settings.
- Click Generate outline (生成大纲) and wait for completion.
- In Review outline (审阅大纲), check the planned slide count, use of source images and any review notices.
- Click Adopt outline and continue editing (采用大纲,继续编辑).
- In Edit outline (编辑大纲), update slide titles and key points. Use Add slide (添加幻灯片) when needed, and check the content before deleting a slide.
- If Page narrative and layout (页面叙事与布局) is available, make the instructions specific: “Three cards for closing taps, taking only the water needed, and reporting leaks; one simple icon per card.” Remove irrelevant reference images.
- Check that each slide has a clear focus, then click Generate page design (生成页面设计).
To download a text presentation at this stage, choose Export text version (导出文字版) → Download PPTX. It lays out the current outline as editable text slides, without generating images.
AI outline refinement (AI 优化大纲) is optional and requires a usable custom text-model configuration. Without one, edit the outline manually and continue to page design.
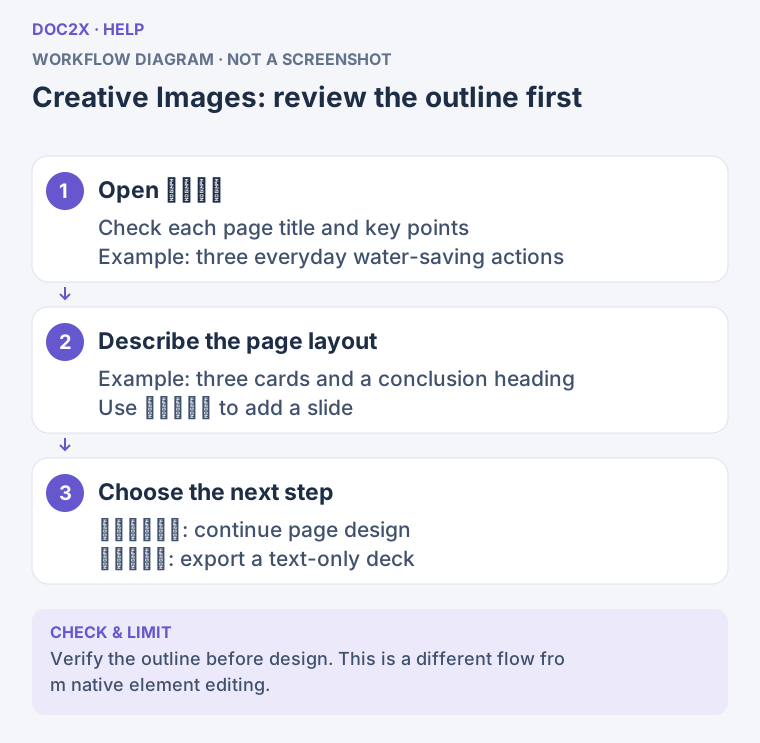
For Creative Images, review slide titles, key points and layout first; continue to page design or export the text-only deck. (workflow diagram). Open the image in a new tab to enlarge it.
Check Page Designs and Generate Images
- In Page design (页面设计), read and edit each slide's visual instructions. Check accuracy, hierarchy and relevance of images.
- A slide's Redesign (重新设计) button changes its design instructions; it does not generate an image immediately.
- Open Settings (设置) and check the image service. Doc2X image generation (Doc2X 图片生成) requires no API Key. Custom services are explained below.
- Return to page design, check the cost notice and click Generate all images (生成全部图片).
- Keep the page open during generation. Each completed image is saved. Cancel generation (取消生成) stops unfinished work and keeps completed images.
- After completion, open Preview and export (预览与导出). If only some slides finish, Go to preview (前往预览) lets you inspect the images already available.
Clicking Generate all images again processes the slides with design instructions again, replaces their old images and clears their previous drawing-board associations. Export any version you want to keep first. It is not a “retry failed slides only” action, and the standard preview has no button to regenerate a single slide image.
Preview, Edit Text and Export
- In Preview and export, check each slide and click an image to enlarge it.
- If the full-slide images are ready, choose Export PPTX → Image PowerPoint (图片版 PowerPoint) → Download PPTX. This does not require text parsing first.
- To edit text and illustrations inside the images, click Edit text and images (编辑文字与配图). Existing usable parsing records are reused; creating new ones requires sign-in.
- After parsing, the workspace tries to open an available slide in its drawing-board editor. To edit another slide, use Edit this slide (编辑此页) beneath that slide in preview, then correct its text, formulas or layout.
- Return to preview and choose Export PPTX → Editable PowerPoint (可编辑 PowerPoint). Check that the ready-page count matches the full project before downloading.
Editable export contains parsed slides only. For example, a six-slide project with only two successfully parsed slides produces a two-slide editable export. Finish parsing the remaining slides to export the full deck. Slides edited in the drawing board use the latest available edits.
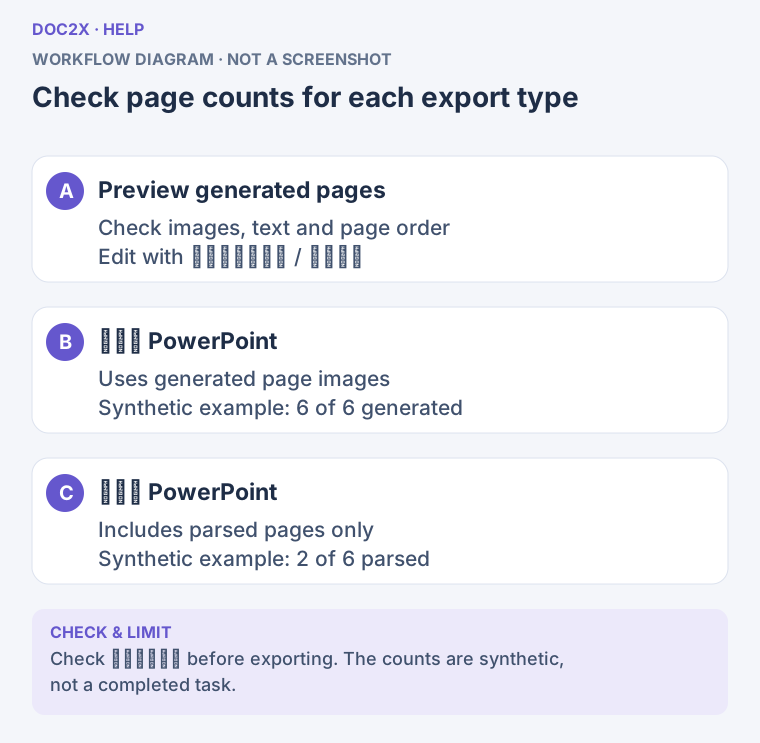
Image and editable exports have different requirements: image export uses generated pages; editable export includes parsed pages only. Check the page count before downloading. (workflow diagram). Open the image in a new tab to enlarge it.
7. Teaching Scenarios: Book Lessons and Exam Explanations
Create Lessons from Chapters
- Select Book to Lessons (书籍转课件).
- Reference a parsed textbook or handout PDF, or create from a topic alone.
- Specify the chapter in Content scope and include the grade, lesson length and goals in the topic. For example:
Create eight classroom slides for middle-school students using the “Protecting Water Resources” section of this handout.
Include an introduction, concepts, everyday examples, a classroom exercise and a recap.
Use only this section. Identify gaps or unsupported claims instead of inventing data.- Choose Smart Layout or Creative Images and follow that method's steps.
- Check chapter coverage, examples and exercises against the source, and add speaker notes where needed.
Start a New One-Question-per-Slide Presentation
- Select Exam Explanation: One Question per Slide (试卷讲解:一页一题).
- Reference one PDF if it contains both questions and answers. For separate files, select the question PDF first, then the answer PDF. This mode accepts 1–2 PDFs.
- Leave Content scope blank for all questions, or enter a range such as
1-10、15、20. - Ask the system to preserve the original questions, match answers from the source, and mark missing answers for review.
- Check question numbers, stems, options, formulas, figures and answers. Each independent question gets one slide; subquestions stay with the parent. Slide count follows the number of questions, so the target-slide input is disabled.
- Review notices such as Answer needs review (答案待核对). Missing or uncertain answers need manual verification; do not treat generated output as an answer key without checking.
If you already matched and reviewed questions in Organize Questions, use Teaching Slides from Reviewed Questions to reuse that result. That workflow includes teaching templates and classroom presentation. It is separate from referencing PDFs here to start a new AI creation task.
8. Models, Points and Custom Keys
| Action | Configuration used | What to know |
|---|---|---|
| Topic/document generation on the default creation page | AI model on the creation page | Billed by the selected text model; no image-service Key setup is required first |
| Doc2X image generation | Platform image model in Settings | Uses account points without a Key; the current notice is 100 points per generated/edited image, and platform AI image generation requires membership access |
| Image generation with Custom service (自定义服务) | Your OpenAI / Gemini configuration | Uses your API Key; the provider charges separately |
| “One sentence / Paste outline” and AI outline refinement | A usable custom text-model configuration | Selecting a model on the new creation page does not configure this older workflow |
Current account entitlements, balance and submission notices govern availability and pricing. The one-time trial for document AI features such as Organize Questions does not imply a free PPT-generation trial. If points run out, follow the notice before continuing with the recorded task. Reopening a completed result is different from starting generation again.
To use a custom image service:
- Open Settings → Custom service.
- Choose OpenAI or Gemini, and enter the service's model, API Key and applicable Base URL.
- Set a supported image size, quality and concurrency.
- Click Save and validate Key (保存并验证 Key), check the result, then click Save configuration (保存配置).
- Return to page design, check the service and billing notice, then generate.
The Key is stored in the current browser; model requests go to the configured provider. Each Provider keeps its own settings, while size/ratio selections may adjust to supported values. For PDF source images as generation references, use Doc2X image generation; a custom image service requires removing those references first.
Platform image batches process at most two slides concurrently. Custom services allow a configured concurrency of 1–8. More concurrent requests are not always faster; lower it if the provider rate-limits requests.
One sentence / Paste outline (一句话 / 粘贴大纲) remains at the top of the page. It is an older workflow requiring a custom text-model configuration, not a prerequisite for the default creation page. If it asks you to configure a text model, click Generate from reference documents (参考文档生成) to return to the default page, where a topic alone is also supported.
9. Saving, History and Recovery
- Local projects: Project data, generated images and edited versions are stored in the current browser or client's local cache. Smart Layout edits are saved locally; check the saved status before leaving.
- Cloud projects: The project list also shows completed AI presentation-generation tasks for the current account. From another browser, you can reopen a result while its cloud task remains available.
- The distinction: The original cloud result is not the latest locally edited version. Later manual edits do not automatically sync to other devices. Download the final PPTX before switching devices.
- New projects: Creating a project keeps previous records. Select an existing project in PPT project list (PPT 项目列表) on the left, or use the project selector on a narrow screen.
- Clearing local cache: This removes local PPT projects and images. Drawing-board edit history uses a separate cache. Cloud tasks can also expire or become unavailable; history is not a permanent backup.
If saving fails, retry saving or export the current PPTX before closing the window so that your edits are not lost.
10. Troubleshooting
| Symptom | What to do |
|---|---|
| A newly uploaded PDF is missing | Confirm parsing has completed and you are in the same account, then refresh the reference list |
| The generation button is disabled | Enter a topic; exam mode also requires 1–2 PDFs |
| Generation without references is not supported | Reference a parsed PDF and retry; the current service environment does not yet support that request |
| Page design works, but AI outline refinement requests configuration | Edit manually and continue, or use an existing usable custom text-model configuration |
| Image generation reports insufficient points, membership or unavailable service | Follow the specific message before submitting the batch again |
| “Edit this slide” is disabled | Run Edit text and images in preview and wait for that slide to finish parsing |
| Editable export has fewer slides | Check the parsed-slide count; image and editable exports have different requirements |
| A linked drawing-board record has expired | Return to preview and run Edit text and images to create a new record |
| A completed task cannot be opened | Use Reopen result or recover the existing task from its cloud-project entry |
For short answers, see the PPT Generator FAQ.